
A rufous-tailed hummingbird in Costa Rica
Back-light is, as you might expect, where the light on the subject is predominantly from behind. What this does is produce a dramatic effect, outlining the subject in rim light. All the more stunning if that light is warm in colour and there is some detail in the subject, like fur or feathers to make an interesting outline, or where the light can shine through those feathers or fur.

A bellowing red deer stag in Studley Royal deer park, Ripon, UK
Camera exposure is important, as you’ll have to capture a wide dynamic range. Shooting in raw will give you the best quality to work with, as you may have to brighten the foreground shadows in post production whilst keeping the highlights where they are. Typically you’ll expose for the bright back-light and make sure those bright parts are on the right hand side of your histogram. Cameras vary greatly in their dynamic range capabilities and the smaller the dynamic range, the less able the camera is to record everything from dark to bright and all in between. The reason I say that you should expose for the highlights is that there’s more data stored in those highlights. Even if the photograph looks a little too bright, you can darken the image later and retain more dynamic range than if you shot with a lower exposure. Just make sure you don’t blow the highlights out so that the brightest pixels fall just within the right hand end of the histogram.

Plains zebra running in the Maasai Mara, Kenya
In the zebra image above, the brightest parts of the photograph are where the sun is behind the zebras’ manes and on their hooves. These pixels will be at the right hand edge of the histogram. Make sure they’re almost but not quite white.
Exposing for the highlights with back lighting often ends up with silhouettes, or near-silhouettes. If you don’t want this effect, you can provide some fill light in the form of flash, or a bounce card. This isn’t always practical for wildlife, and sometimes it isn’t ethical if it would compromise the sight of the animal. I’ll do a separate blog on flash with wildlife, but it’s a very useful tool that’s often overlooked.

Fallow deer at Studley Royal
If flash isn’t an option and you have an image which you’ve exposed perfectly for the highlights with back-light, but the foreground is too dark, all is not lost – as long as you’ve shot in RAW. I was reminded of this when submitting some tropical bird photos to the RSPB’s image library yesterday, where the back light was often very strong. With a RAW image, you can boost the shadows quite a bit in post production without introducing blockiness or noise. This has the effect of balancing out the dynamic range in the image to be more what the eye can see. Very few cameras can match the range of the human eye, so RAW shooting is definitely your friend here. I’ll do an article about when and how to boost shadows in the future. The image of fallow deer above was shot with the highlights at the right hand end of the histogram and the foreground shadows needed lifting to balance the photograph.
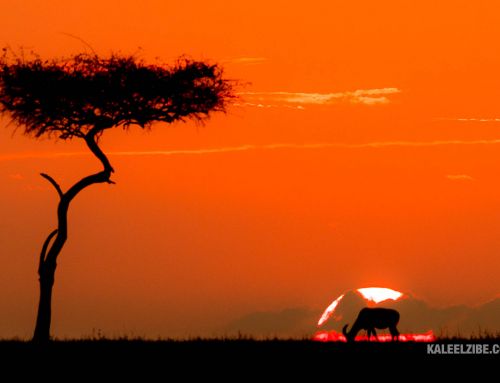
If you have warm sunshine, particularly at dawn and dusk, the camera’s white balance (if on auto) will often assume the scene is a lot cooler than it actually is. You can counteract this by setting a warmer white balance of cloudy or even shade. Occasionally it may have to go beyond this. The best method is to shoot in raw and choose the white balance that matched what you saw in post production. The following image was taken at dawn and the colours really were that orange. I had to dial the colour temperature in to Lightroom afterwards to match what I saw.

Ultra runners near Hadrian’s Wall, Northumberland, UK
Similarly with this robin, I had to make sure the white balance matched the strong warm colours. Sometimes it will be necessary to boost vibrance and/or saturation to really bring out the colours, too.

A robin in our garden, Newcastle-upon-Tyne, UK
Interestingly with this robin image, you’ll also notice the strong lens flare and out of focus blurring of direct sunlight into the lens. It can be quite a creative thing to harness, although be careful when looking directly at strong sunlight through your camera, as you could damage your eyes and the camera’s sensor.
I’ll round this post off with three more images which show the use of lovely warm back light: firstly a rim-lit wildebeest (its beard works perfectly for back-light), then a short-eared owl (the lovely evening back-light is when these crepuscular predators hunt) and lastly dawn in Kielder Forest (the back-light coming through the trees and other foliage makes the image so much more interesting than if it had been shot with the sun behind).

A lone wildbeest, Maasai Mara, Kenya

A short-eared owl hunting in the evening light, Northumberland, UK

Thank you so much for this tutorial, my problem is how I have never got to grips with Lightroom, do you have any advice for a dummies guide? Thanks again, Jo
My pleasure! Glad you’ve found it useful, Jo 🙂 As for Lightroom, it’s one of those programs that when you sit in front of it for the first time, it looks super daunting. I guess my advice would be to always shoot in raw, import into Lightroom and then start processing from the top right hand side of the screen downwards. i.e. with white balance, exposure, highlights and so on: that section. You can do most of what you need in there. A lot of stuff is unnecessary for most situations in Lightroom. Once you’ve fiddled with the main exposure settings, do a bit of sharpening and export to jpeg with sRGB colour space for the web. Obviously I’m massively skating over most of the features here, but the key message is don’t be daunted. It’s an amazing piece of software. There are various tutorials online. Maybe do a search on YouTube for Lightroom tutorials. There should be plenty of people doing free tutorials on there.
[…] because the light comes in at more of an angle and creates a more 3D effect. Or it might create back-light for extra drama. All is not lost if the light isn’t great though: often, converting to black and white and […]